Translate

February 22, 2013

Cupcake Oven Mitt

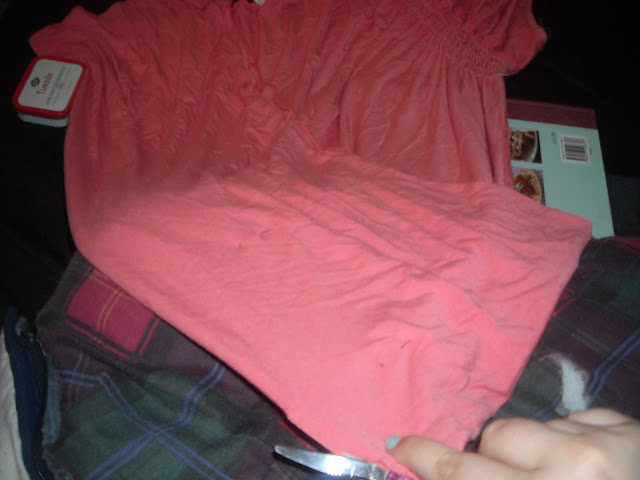
I've been inspired by several cupcake oven mitts on pinterest lately. In fact, obsessed is probably a better word. So, as I have no money right now, I went to my Nan's and raided her arts and craft supplies. I came home with lots of goodies and set to work. I made several mistakes along the way but it didn't turn out half bad.

- I plan to hunt out some red fabric and cut out a couple of circles to on the "icing" where the green ribbon is so that the green ribbon becomes a cherry stalk -

I'm not going to do a full tutorial - I'm just going to run through the main stuff.

I used - Green fabric (I used less than half a metre)
Plain cream fabric (I used waaaay less than half a metre)
Green ribbon (I used approx 5 inches)
Some tea towelly fabric (or you can just use an old tea towel or two)
And last but not least a small amount of padding.
I drew a terrible template (the icing is drawn on as I wanted my cupcake and my icing to fit together as perfectly as possible)


I pinned the template to my backing fabric and the tea towelly fabric and cut them out.


And the view from the other side

Then I pinned the template to my cream fabric and cut the icing (you can see one of my mistakes below - having to add my seam allowance as I went haha)

I sewed the icing leaving a gap at the top. Then I sewed the cupcake with right sides together and tea towelly stuff and padding on top leaving a gap at the top. Turned it all in the right way and it fitted perfectly.

I sewed around the outside to fit them together (popped the ribbon ends inside the icing) and added some stitches to the middle of the cupcake section to re-create the ridges you find in a cupcake casing.

If you need a more thorough tutorial I would recommend Lovely Crafty Home - I used that tutorial to give me an idea for what to do when I got stuck and it was really helpful. I probably would have followed the tutorial but I'm a bit to free spirited and have to just wing everything haha.

How To Shorten & Re-Hem A Dress


I have this kinda OCD thing about dresses having to fall at certain points on my body. Mid thigh, knee length or full length. There are no other options. So when I ordered a gorgeous dress online and it turned out it fell right above my ankles I had two options - send it back or alter it myself. So I altered it myself haha. It's now mid thigh length.

(Please ignore the water bottle and the fact it's laid out on the sofa bed haha)

Step One: Try it on - Before you even think about taking a pair of scissors to it you need to pop it on so you can take into account how it falls on you. For example in my case boobs aren't an issue because of the cut of the dress but I do need to consider the weight I've yet to lose after having my son.

Step Two: Do the Hokey Cokey! Okay not really. But I did almost look like it as I folded and popped pins in (while wearing it) to work out how much to take off!


Step Three: Take it off and flip it inside out! (Excuse the sleeping bag - I was trying to keep my legs warm haha).


Step Four: Fold and Pin! I folded the whole bottom in one direction and pinned it.

Step Five: Cut in the crease. 


Step Six: Fold the bottom over by about one inch on either side of the dress. Now fold it over another inch so that there is no open seam on show.
Pin every couple of inches. Make sure you have enough of a gap between them to seperate the two sides of the dress (as pictured above).


Step Seven: Open the gap between the pins as shown previously. Now pin the hem on each side of the dress and remove the pins holding both sides together as you go.

Step Eight: Pop it on the sewing machine - I put the edge of the sewing foot against the edge of my fabric to make sure I had a straight hem.

Happy Birthday! And some sad news...

Sorry for vanishing for so long, I shall explain in a moment and then I will be adding a couple more blog posts today on some craftiness. First thing is first - Wednesday was my birthday!
(Sorry about the crappy editing haha, I'm still half asleep)

Also last week was my brothers birthday.

Then there's the sad news. Last week (on my brothers birthday) one of my uncles unfortunately passed away. It's hit my Mom pretty hard and I'm still trying to wrap my head around it.

The anniversary of Danny's death is coming up and I can already feel the heart break setting in again so if I vanish, that'll be why. I become an emotional wreck and do nothing but cry and talk to my brother and phone/email my dad just to tell him how much I hate him for once again not taking my to my brothers grave. I then spend all my time searching online trying to track down Russell and failing miserably...
(Danny is/was one of my brothers - Russell is another one)

Sorry for this super depressing post. I have a couple more posts today to pop up - an inspiration board and some tutorials so feel free to skip over to those and be les
s depressed.

February 06, 2013

Inspiration and illness


I'm ill. I hate being ill. So to distract myself from barely being able to leave my bed I've been working on a bit of a dream home project. So here as some inspirational photos and what I like out of them. Apologies to anyone that's photos I've stolen, I haven't been able to post links to blogs because they're a combination of pictures I've stolen from pinterest and google that were unfortunately not linked to blogs. Quite annoying as I hate not being able to give credit where it's due.


I'm loving the wall colour and counter top in this. The cabinet colour is a bit too dark for my taste.

As above, the wood is a bit dark. I love the entire style but I'd like the wood to be more of a medium or light wood.

This looks a bit cluttered so I'd want some extra/hidden storage But I love how light and airy it is. And I love how big the bath is!

I'm in love with this bathroom! I'd like a bit more colour on the walls. Maybe that pale greeny blue from earlier and paler tiles on the floor and I'd stick a bit of storage under the sink but other than that it's perfect!

I love the layout of this room. It's almost like it has two areas. The sleeping area and the big play area. I also love how the walls and floor are plain and sophisticated and the room is made "childish" with the use of accessories, which will make it easier for the room to mature as your children do!

I love that there is a huge blackboard wall for the children to be creative and artistic on. 

This room is very similar to the idea I had in my head. A bit of wallpaper for a feature wall, neutral walls for the rest of the room and then letting the accessories make the room childlike. Although I was planning on having a normal bed and then a pop up tent or a fort on the other side of the room for playing in. (I like to keep playing and bed slightly seperated.

I'm completely in love with this sink and the curtain underneath. When I was growing up I spent a lot of time at my Nan's and she had a traditional farmhousey cottage and she had one of these curtains. Underneath the cats and dog would sometimes hide and in winter her tortoises would hibernate in there box where the cold and hot pipes get them the perfect temperature. In fact, sometimes they wouldn't even hibernate properly haha. It's such a fond memory of my childhood that I'd love to continue it!

I love the colours of this kitchen. Especially the way in the background under the arch you can see the white tiles but look to the side and there are cream and brown tiles to tie in with the rest of the kitchen.

The colours are light and airy but not too plain, and has a slightly traditional feel to it which is what I'm looking for.

Now admittedly this kitchen is a little more modern but I can't but love it. The way the counters, floor and dining table set all sort of match. The white cabinets and creamy white walls keep it light and spacious but I especially love how they've popped a random mix of blue tiles in to give it a splash of colour without over doing it.

I love the darkish bottom cabinets, the butchers block counter tops, the sink and the walls with their little shelves. God I just love the whole thing! This is my dream kitchen!!!

I love the mix of traditional and modern in this room. The wooden floor and painted fireplace, the sofas are modern. The mantle piece and walls, the art work are so traditional. I love it!

This is slightly more modern but still a nice little bit of traditional thrown in. The art work and fireplace in particular.

This master bedroom is just gorgeous. Very traditional cottagey feel. Reminds me quite a lot of my Nan's place!

This is my dream bedroom. Perfect combination of modern and traditional!


Another one of the bathrooms I had a look at. I adore it :) Other than wanting to add more storage (the shelf looks so cluttered!) it's perfect!

Once I'm back on my feet I'll be snapping lots of pictures for you to show you my before rooms and getting to work on making my little home gorgeous :) x

February 03, 2013

Feeling Inspired

Sorry for vanishing my lovelies! I really didn't mean to, life has just been so hectic!
But I come baring good news, I have lots of projects planned!

So let's take it room by room.


Kitchen!
At the moment I have an undercounter fridge and my freezer is in the lounge. I plan to take off the little bit of counter above the fridge and remove the cupboard above so I can stick a fridge freezer in there instead! I plan to get some pale green on the walls and I'm going to build a little indoor window box for my kitchen windowsill to keep my fresh herbs in. I'm going to clear out and re-organise my kitchen cupboards.


Lounge!
I'm planning to switch the position of the TV and sofabed so that the two sofas face each other with the tv between them but against the wall. I'm planning to build my own breakfast nook, repaint some of the living room furniture, make a minky throw or two and some cushions.


Master Bedroom!
This room involves the least work. I'm moving the furniture around a little and possibly sprucing up a couple of bits of furniture with some paint and/or wallpaper. I also need to do some kind of flooring, maybe laminate?


My Sons Room!
This room doesn't involve much building but will be a lot of effort as I'm painting the walls cream, then copying one of the steam engines off his bedding onto one wall. This furniture will all be painted one shade darker than the walls and will also have the steam engine painted on them. It's tough to explain but I know how I want it in my head, I'll be sure to pop a load of pictures on.


Hallway!
I'm planning to pop some sort of laminate down, stick up a couple of pictures and a coat rack/coat hooks. I'm also planning to pop some hooks into the bottom of the canvas as an artistic key rack.


Inspiration time!

All of the pictures below are inspiration. My finished product will not be a replica, it will be my own twist on it. If a picture doesn't have a web address under it then it's an image I have found on google images and isn't from someones blog. If you like any of the ideas below then please pop on over to the blog/s and take a further look.

 I want to create a cross between these two dining areas.
The breakfast nook above is from Addicted2Decorating.com
 The dining tale and bench above is from domesticimperfection.com
The dresser is from twostorycottage.com
This idea is from classyclutter.net


The next couple of pictures are from google image


s


December 31, 2012

DIY lampshade - Doily Lampshade

I've decided on the lampshades I want for my living room after seeing this picture...


How gorgeous and homely is that?
So I decided that's what I want, and better yet I'm going to make one!


December 30, 2012

Pinterest and Paint Samples


As much as I love my furniture I want something more cosy and country style.
You have to understand that I'm a country girl. I grew up in a farming village. I spent the best part of my childhood in my Nans gorgeous country farmhousey cottage!


My heart just isn't in this flat, so I've decided to do something about it and decorate!

You can't decorate without an idea of what you want it to look like, so I've finally gotten around to joining pinterest and now I just need to stop being so damn indecisive.

I always loved the look of the brown, white and black living room I have but it didn't feel right. I couldn't put my finger on it until recently when some random tears over this gorgeous cottage on TV made me realise how much I missed the country feel. My living room is far too modern.

I'm all for laptops and flat screen TVs (not that I own one just yet haha) and I love my leather sofas but the rest of the room needs some serious work.
So I've decided to do some shabby chic sort of thing to my furniture and give the walls some paint etc. So here's some images of what I like the look of.. Next comes the hard task of making final decisions of what I should go for!
Any input is welcome :)